Sorry that it took me sooooo long to post after Easter but hubby and I had a rough couple of weeks. We've been trying to do something for ourselves for a long time now....and we'll talk about that after the 15th of June because we don't want to spoil it. So stay tuned for the big reveal :*)
And for today I have for you a little tutorial on how to make this cute dotty Easter eggs.
All you need is:
- hard boiled eggs
- hot glue gun and lots of glue sticks (I only made 10 eggs and got through 3 small glue sticks)
- your favourite liquid egg paint and containers for it
- tissue paper for laying the eggs after you take them out of the paint
- old newspaper to keep you from messing up your working table
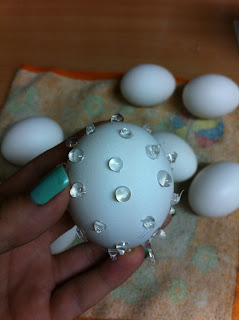
and start adding dots of glue on your eggs an make sure that they stick to the egg and don't fall down. Like this:
This was my test egg to see how it will turn out and I discovered that many small dots don't work quite well and some glue dots fell of my egg in the process. So stick to fewer and bigger dots of glue.
Step 2: put the eggs in your coloring liquid of your choice (prepare the liquid as usual and follow the instructions on your package) and follow instructions on how long the eggs must stay in the liquid for the color to stick on them. For short: paint the eggs how you would usually do them.
And this is how my test egg turned out.
Not quite ok but I've learn a few things: big dots of glue, fewer dots on the egg and don't mix the egg to much in the paint because the dots of glue will fall (my coloring liquid requires to put the eggs in the hot liquid and I think that the heat makes the glue softer and falls of the egg).
So here several eggs painted and with the glue dots on them.
And here are all the eggs with the glue dots removed. You can see my green test egg and the difference between it and the rest of them.
PS. I used white eggs because I wanted my dots to be white.
I hope you find my tutorial useful and if you do try it please let me know. I would love to see what you come out with.
And here is the final picture.
Love and kisses,


No comments:
Post a Comment